Jump to content


Photo

L+l Cs

A Sidearm Development Kit

14 replies to this topic

#1 CaptainSlug

CaptainSlug

    Resident Mad Scientist

  • Administrators
  • 4,763 posts

Posted 19 November 2008 - 04:37 AM

Since I don't have the time or interest to work on this myself at the moment I'm just going to provide the source files. The construction methods are identical to that of the +Bow with only minor changes to part arrangements for the sake of saving space and reducing material usage.

If you only made one +Bow with the required materials then you have more than enough remaining plastic sheet to make an L+L. If you have made a +Bow already or you are planning to make a +Bow you will need to add the purchase the following items in order to make one L+L.
8585K43 - Polycarbonate Round Tube 1-1/2" OD, 1-3/8" ID, Clear = $3.48 for one Foot

4880K314 - Std-Wall (Schedule 40) White PVC Pipe Fitting 1" X 1/2" Sz, Pipe End Male X Socket Fem, Hex Bushing = $0.74 Each

92510A700 - Aluminum Unthreaded Round Spacer 1/2" OD, 1/8" Length, #6 Screw Size = $1.20

91780A131 - Aluminum Female Threaded Hex Standoff 1/4" Hex, 3/4" Length, 6-32 Screw Size = $0.44 Each (5) = $2.20

93505A111 - Aluminum Male-Female Threaded Hex Standoff 3/16" Hex, 1/4" Length, 6-32 Screw Size = $0.44 Each (4) = $1.76

90309A154 - Zinc-Plated Brass Unthreaded Round Spacer 3/8" OD, 1/4" Length, #6 Screw Size = $0.59 ea (2) = $1.18
Total: $10.56

The rest of the parts are
9637K26 - Continuous-Length Compression Spring Spring-Tempered Steel, 11" L, .844" OD, .08" Wire - $10.12 per Pack of 5

90402A144 - Zinc-Plated Steel Pan Head Phil Machine Screw External Washer, 6-32 Thread, 1/4" Length = $5.36 per 100

90402A146 - Zinc-Plated Steel Pan Head Phil Machine Screw External Washer, 6-32 Thread, 3/8" Length = $5.31 per 100

90631A007 - Grade 2 Hex Nylon-Insert Locknut Zinc-Plated Steel, 6-32 Screw Sz, 5/16" W, 11/64" H = $2.02 per Pack of 100 (you only need two)

90272A159 - Zinc-Pltd Stl Pan Head Phillips Machine Screw 6-32 Thread, 2" Length = $5.71 per Pack of 100 (you only need one and you can also use a threaded rod)

90272A155 - Zinc-Pltd Stl Pan Head Phillips Machine Screw 6-32 Thread, 1-1/4" Length = $2.96 per pack of 100 (you only need two)

90272A151 - Zinc-Pltd Stl Pan Head Phillips Machine Screw 6-32 Thread, 3/4" Length = $2.96 per pack of 100 (you only need five)

Instead of a compression spring the trigger plate is tensioned by a rubber band (doubled-up if needed) or extension spring of your choosing. This reduces the bulk on the top of the blaster.
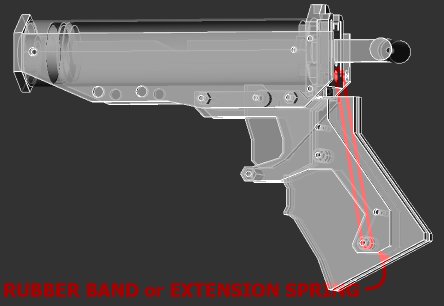
Posted Image

Here's the SDK package
http://www.captainsl.../lplusl_sdk.zip (730kb)
which includes the partlist, .doc machining template sheet, Alibre Xpress .AD_PRT file, and the above image

Edited by CaptainSlug, 19 November 2008 - 04:49 AM.

  • 0
The little critters of nature, they don't know that they're ugly. That's very funny, a fly marrying a bumble bee. I told you I'd shoot, but you didn't believe me. Why didn't you believe me?

#2 hereticorp

hereticorp

    Member

  • Members
  • 621 posts

Posted 19 November 2008 - 07:05 AM

Since I don't have the time or interest to work on this myself at the moment I'm just going to provide the source files. The construction methods are identical to that of the +Bow with only minor changes to part arrangements for the sake of saving space and reducing material usage.

Here's the SDK package
http://www.captainsl.../lplusl_sdk.zip (730kb)
which includes the partlist, .doc machining template sheet, Alibre Xpress .AD_PRT file, and the above image


Very nice, been looking forward to this, thanks for putting it up.
  • 0

#3 Draconis

Draconis

    I am not Lord Draconical

  • Members
  • 2,712 posts

Posted 19 November 2008 - 11:31 AM

Thanks a million for the head start!
  • 0
[15:51] <+Noodle> titties
[15:51] <+Rhadamanthys> titties
[15:51] <+jakejagan> titties
[15:51] <+Lucian> boobs
[15:51] <+Gears> titties
[15:51] <@Draconis> Titties.
[15:52] <+Noodle> why is this so hard?

#4 Kid Flash

Kid Flash

    Member

  • Members
  • 1,985 posts

Posted 19 November 2008 - 05:35 PM

I guess when I get the supplies need to make 2 l+ls... One of this and one of hetericorps's plans.
  • 0

#5 L0pper

L0pper

    Member

  • Members
  • 61 posts

Posted 19 November 2008 - 05:58 PM

I really like the rubber band/extension spring assisted cocking mech. It leaves the gun looking much cleaner.
  • 0

#6 hereticorp

hereticorp

    Member

  • Members
  • 621 posts

Posted 19 November 2008 - 06:20 PM

I guess when I get the supplies need to make 2 l+ls... One of this and one of hetericorps's plans.


You mean one CS and one A Side of Nerf, I didn't design the original L+L, I just put one together.

Edited by hereticorp, 19 November 2008 - 06:21 PM.

  • 0

#7 cheesypiza001

cheesypiza001

    Member

  • Members
  • 752 posts

Posted 19 November 2008 - 07:04 PM

Is there any free application for a Mac that I can view the Alibre Xpress .AD_PRT file on? I know that Boltsniper had a Microsoft Excel file for some of his plans. If not, then could someone please provide a few screenshots showing the L+L plans?
Thanks in advance.

-Cheesypiza001
  • 0

#8 Draconis

Draconis

    I am not Lord Draconical

  • Members
  • 2,712 posts

Posted 19 November 2008 - 07:25 PM

Is there any free application for a Mac that I can view the Alibre Xpress .AD_PRT file on? I know that Boltsniper had a Microsoft Excel file for some of his plans. If not, then could someone please provide a few screenshots showing the L+L plans?
Thanks in advance.

-Cheesypiza001


What are you looking for? The templates? Or the 3D model? Because both of those are in the file linked to above.
  • 0
[15:51] <+Noodle> titties
[15:51] <+Rhadamanthys> titties
[15:51] <+jakejagan> titties
[15:51] <+Lucian> boobs
[15:51] <+Gears> titties
[15:51] <@Draconis> Titties.
[15:52] <+Noodle> why is this so hard?

#9 CaptainSlug

CaptainSlug

    Resident Mad Scientist

  • Administrators
  • 4,763 posts

Posted 19 November 2008 - 07:36 PM

Is there any free application for a Mac that I can view the Alibre Xpress .AD_PRT file on?

The Alibre XPress file is just a CAD file of the assembled blaster. It's only included for the purpose of allowing people to reconfigure individual templates if needed. All you really need is the .doc file.
  • 0
The little critters of nature, they don't know that they're ugly. That's very funny, a fly marrying a bumble bee. I told you I'd shoot, but you didn't believe me. Why didn't you believe me?

#10 cheesypiza001

cheesypiza001

    Member

  • Members
  • 752 posts

Posted 19 November 2008 - 08:26 PM

I was looking for the 3D model. Alibre Xpress is only for use with Windows. I am on a Mac and it would be good to know if there is any free software for viewing the 3D designs of future homeades that were designed in CAD.

Edited by cheesypiza001, 19 November 2008 - 08:29 PM.

  • 0

#11 CaptainSlug

CaptainSlug

    Resident Mad Scientist

  • Administrators
  • 4,763 posts

Posted 19 November 2008 - 08:37 PM

Well, no. It's pretty rare that I provide CAD files at all.
Solid CAD is even more of a windows-exclusive software area than games are.

Edited by CaptainSlug, 19 November 2008 - 08:38 PM.

  • 0
The little critters of nature, they don't know that they're ugly. That's very funny, a fly marrying a bumble bee. I told you I'd shoot, but you didn't believe me. Why didn't you believe me?

#12 Draconis

Draconis

    I am not Lord Draconical

  • Members
  • 2,712 posts

Posted 01 December 2008 - 03:54 PM

Okay, I have finished assembly of my first L+L using these plans. Everything went quite well, really.

Posted Image

Except for where my own stupidity got in the way... :-/

Posted Image

The two minor issues I ran in to are that the top of the trigger above the pivot hole runs in to the plunger tube, and that you need to be careful where you drill the holes in the side of the spring rest plate. The trigger needs to either have the hole drilled a little bit higher, or (as I did) just round out the outside fillet a little. The plate is just my fault, not paying attention. When lining up the holes in the plunger support plates with the spring res, don't just rest the plate all the way down on to the flat spot on top of the trigger guard plates. If you do, the the top holes may interfere with the screws holding the catch plate on. But if you give it just a little space underneath (2-3mm) and you'll be fine.

Suggestions: This thing is soooooo close to requiring exactly six inches of plunger tube, that I couldn't bear to cut a full 6.5" tube from a length of poly carbonate. I think the front plunger tube retention holes need to be moved back about 1/2" to allow the use of exactly half of a one foot section. To allow 1/2 +Bow spring, I suggest using 1/8" polycarb for the rear tube retainer ring, instead of 1/4", just to give it a little extra space. Maybe ditch it altogether and use the screw holes instead. I have just received my latest McMaster order (like while I am writing this), so I need to go fix the plunger before I post ranges.

Edited by Draconis, 01 December 2008 - 04:04 PM.

  • 0
[15:51] <+Noodle> titties
[15:51] <+Rhadamanthys> titties
[15:51] <+jakejagan> titties
[15:51] <+Lucian> boobs
[15:51] <+Gears> titties
[15:51] <@Draconis> Titties.
[15:52] <+Noodle> why is this so hard?

#13 hereticorp

hereticorp

    Member

  • Members
  • 621 posts

Posted 01 December 2008 - 04:16 PM

Okay, I have finished assembly of my first L+L using these plans. Everything went quite well, really.

The two minor issues I ran in to are that the top of the trigger above the pivot hole runs in to the plunger tube, and that you need to be careful where you drill the holes in the side of the spring rest plate. The trigger needs to either have the hole drilled a little bit higher, or (as I did) just round out the outside fillet a little. The plate is just my fault, not paying attention. When lining up the holes in the plunger support plates with the spring res, don't just rest the plate all the way down on to the flat spot on top of the trigger guard plates. If you do, the the top holes may interfere with the screws holding the catch plate on. But if you give it just a little space underneath (2-3mm) and you'll be fine.

Suggestions: This thing is soooooo close to requiring exactly six inches of plunger tube, that I couldn't bear to cut a full 6.5" tube from a length of poly carbonate. I think the front plunger tube retention holes need to be moved back about 1/2" to allow the use of exactly half of a one foot section. To allow 1/2 +Bow spring, I suggest using 1/8" polycarb for the rear tube retainer ring, instead of 1/4", just to give it a little extra space. Maybe ditch it altogether and use the screw holes instead. I have just received my latest McMaster order (like while I am writing this), so I need to go fix the plunger before I post ranges.


That looks pretty sweet, I'm in the process of cutting out pieces for my own version of this but I got distracted by my clear maverick LED mods, so it'll be a little bit before I get this thing off the ground.

I'm going to try to use the 6" piece of plunger and maybe use retaining bolts instead of the rear tube cross, we'll see how it comes together. Or I could hollow out the center of the cross and let the spring rest inside.
  • 0

#14 Draconis

Draconis

    I am not Lord Draconical

  • Members
  • 2,712 posts

Posted 03 December 2008 - 02:23 AM

I removed the cross and shortened the tube to 6" today. I was forced to cut a bit of the reducer bushing off, in order to make everything fit nicely too. The front holes in the side plates ended up being drilled about 1/2" farther back. It's pretty consistent now, at 55-65 feet, with a short barrel. I think that I will go ahead and switch out the PVC tube with polycarbonate to see what that gets me. I am expecting a bit more range, as the PVC tube appears to have to variation in the wall thickness, which I think is slowing down the plunger head.

EDIT: I have replaced the plunger tube, but haven't had time to test ranges. Perhaps tonight. The Polycarbonate doesn't seem to be any better, though. The rubber washer may be irregular or something. I will need to take a closer look, and maybe replace it with another unit.

EDIT again: The washer was indeed irregular. Replacement of the washer increased plunger speed considerably. With a short CPVC barrel and stock taggers and sonics, I was getting 60-70 feet. Of course, the day after I finished reassembly, I brought the L+L to the shop so I could test ranges with stefans at lunch. Unfortunately, my father's asshole friend reefed on the plunger (while I was on the phone with a customer) and broke the rod. I haven't gotten around to machining another. Perhaps tonight. Definitely tomorrow.

Edited by Draconis, 12 December 2008 - 06:24 PM.

  • 0
[15:51] <+Noodle> titties
[15:51] <+Rhadamanthys> titties
[15:51] <+jakejagan> titties
[15:51] <+Lucian> boobs
[15:51] <+Gears> titties
[15:51] <@Draconis> Titties.
[15:52] <+Noodle> why is this so hard?

#15 Draconis

Draconis

    I am not Lord Draconical

  • Members
  • 2,712 posts

Posted 20 January 2009 - 02:10 AM

Update!

I finally got moving and machined a replacement plunger rod for the L+L. I performed some range tests with a some relatively well made stefans, and few different lengths of CPVC, at 3", 6", and 12" (Bathroom Breech). The short barrel ranges varied from 65-80 feet. The 6" barrel ranged 75-90 feet, while the 12" breech ranged from 75-80 feet. I need to do some more variations of barrels, because I think I can squeeze some more range out if I get the right length. All in all, excellent results, though.
  • 0
[15:51] <+Noodle> titties
[15:51] <+Rhadamanthys> titties
[15:51] <+jakejagan> titties
[15:51] <+Lucian> boobs
[15:51] <+Gears> titties
[15:51] <@Draconis> Titties.
[15:52] <+Noodle> why is this so hard?


1 user(s) are reading this topic

0 members, 1 guests, 0 anonymous users